Thanks to the pandemic, virtual catchups and online meetings using tools like Microsoft Teams are the new norm.
And if you want to present something during a virtual meeting, you can use screen sharing features to share content from your device with your colleagues.
But how to share screen in Microsoft Teams?
In this article, we’ll go over the steps to share screens on Microsoft Teams. We’ll cover the steps for multiple platforms and also discuss how to give and take control of your shared screen.
As a bonus, we’ll cover some commonly asked questions to help you understand Microsoft Teams’ screen sharing capabilities.
This article covers:
(Click on a link below to jump to a specific section)
- How to Share Screen in Microsoft Teams (Step-by-Step Guide)
- How to Share PowerPoint Slides on Microsoft Teams
- How to Give Control of Shared Screens
- How to Request Control of Shared Screens
- 3 Microsoft Teams Screen Sharing FAQs
Let’s get started.
How to share screen in Microsoft Teams (step-by-step guide)
Microsoft Teams is a popular collaboration and video conferencing tool that allows people to communicate effectively across different mediums.
The platform allows your team to communicate via chat, call, video calls and also integrates with other Microsoft 365 services like PowerPoint and OneDrive for additional functionality.
The Microsoft Teams Screen Share feature is excellent for hybrid and remote work collaboration.
In the following sections, we’ll explore how to share screens using Microsoft Teams on desktops (also known as desktop sharing), mobile devices, and the Microsoft Chat app.
1. On desktops
Here’s a step-by-step guide on how to share your screen during a Microsoft Teams meeting.
Step 1
Click on the meeting link to join and choose if you want to share the computer audio with your team.
Step 2
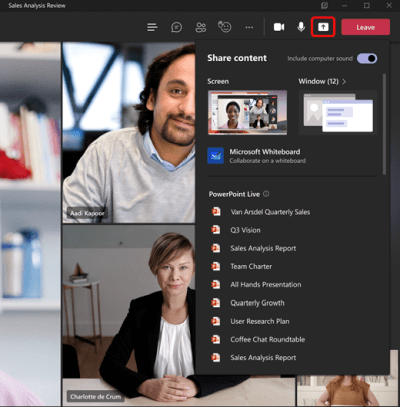
Next, click on the Share Content option in the meeting controls.
Step 3
Select a specific app or window you want to share:
- The Screen option lets you share everything on your computer screen.
- The Powerpoint Live option allows you to share a PowerPoint presentation.
- Microsoft Whiteboard and Freehand by Invision enable you to share a whiteboard where the participants can sketch together.
- The Window option allows you to share a specific desktop app that you have opened. You can also share multiple screens or slides during a presentation.

Note: Your desktop activity is visible to your teammates during screen sharing. But the meeting participants won’t see any notifications that you might get.
Step 4
After you’ve decided what you want to share, a red border surrounds what you’re sharing.
Note: Linux users won’t be able to share their windows or see the red border while sharing content.
Step 5
Click on the Stop Sharing button at the bottom of the Microsoft teams screen to stop sharing your screen.
2. On mobile devices
You can use the Microsoft Teams app on any Android phone, iPhone, or iPad to share the entire screen with your team.
Here’s how you do it:
Step 1
Open Microsoft Teams on your mobile device. In the Teams app, join the meeting where you’d like to share your screen.
Step 2
In the meeting, click on the three dots at the bottom of your screen. From the three dots menu, click on the Share button.
Note: If you’re sharing your screen on an Android phone, you will see a Display Over Other Apps page. Here, find the Teams icon and tap it. Then enable the Allow Display Over Other Apps option.
Step 3
Choose the Share Screen option. To include audio in your screen sharing, toggle on the Audio option.
Step 4
Tap the Back button to go back on the Microsoft Teams screen and select Start Now.
If you’re using an iPhone or iPad, click on the Start Broadcast option.
Step 5
A red border will appear around your phone’s screen during the screen share. To stop sharing your screen, click on Stop Presenting.
3. On Microsoft Teams chat
Sometimes, you might want to share your screen while using Microsoft Teams’ chat function. Fortunately, this feature is available in Mac OS and Windows apps.
Here’s how to share your screen using the Team’s chat app:
Step 1
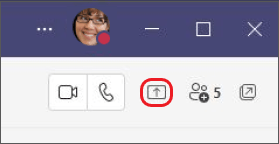
First, click the screen-sharing icon in the top right corner of the chat window.

Step 2
Next, select Screen 1 or any of the apps listed under Window, depending on what you’d like to share. For example, the window option will show apps like PowerPoint or Notepad.
Step 3
Screen sharing will start automatically as soon as you select the apps under the window.
Step 4
Once you’re done sharing content with your team, click Stop Presenting in the top bar to stop sharing your screen.
In the next section, we’ll check how to share PowerPoint slides on Microsoft Teams.
How to share PowerPoint slides on Microsoft Teams
Many people use Microsoft PowerPoint to create presentations that easily represent their ideas.
Here’s how you can share your PowerPoint presentations on Microsoft Teams:

Step 1
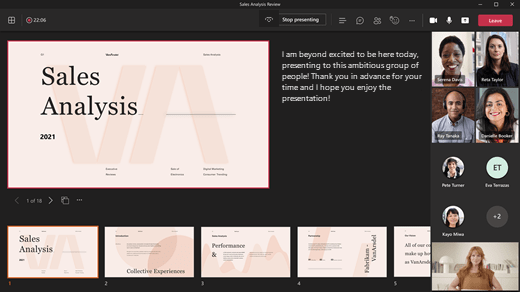
Start by locating your meeting control section and clicking on the Share icon. Then, choose PowerPoint.
Step 2
Next, select your file from the PowerPoint section. This list shows the most recent files on your desktop.
So, if you’ve opened or edited files on your OneDrive or in your team’s SharePoint site, it’s listed here. If you select a file from this list, it’ll allow all the meeting participants to see the slides directly.
You can also select Browse if the file you’re searching for isn’t listed.
Note:
- If you click on Browse to select a PowerPoint file for the presentation that hasn’t been uploaded to Teams before, it will get uploaded as part of the meeting.
- If you’re sharing the presentation in a channel meeting, the file is uploaded to the Files tab, and every team member can access it.
Step 3
You can navigate through the slides by using the navigation arrows at the bottom left of the screen. To jump forward or backward, select a slide from the thumbnail list.

While presenting your slides, some of the meeting participants may want to access your shared screen. Read on to learn how you can give control of your shared screen to your colleague in Microsoft Teams.
How to give control of shared screens
Here’s how you can give control to another meeting participant so that they can demonstrate something.
Step 1
At the top of the screen, you’ll see the content sharing menu. Hover over it and select Give Control to whoever you wish to.
Step 2
Microsoft Teams then notifies that person that you’re sharing control with them. They can make selections, edits, and modify the shared screen however they want.
Step 3
When you want to stop giving control to the participants, you can click the Take-Back Control button in the toolbar.
How to request control of shared screens
Here’s how you can request control of the shared screen if another person is sharing their screen.
Step 1
Select Request control from the toolbar menu. The person sharing the screen can approve or deny your request.
Step 2
After your request is approved, you can make edits or selections to the shared screen as per your need.
Step 3
When you’re done, click on Release control to give back your controls to the presenter.
Next, we’ll answer some common questions that you might have about using Microsoft Teams.
3 Microsoft Teams screen sharing FAQs
Here’re some commonly asked questions regarding Microsoft Teams’ screen sharing feature.
1. What can I share while sharing screen?
Here’re some examples of the content you can share.
- Your entire desktop, including the files you’re accessing, browser windows, etc.
- A single browser window like Google Chrome or Microsoft Edge.
- A single PowerPoint file.
- Microsoft Whiteboard app.
- Your computer sound (including system audio).
2. Can I zoom in or zoom out of content while sharing screen?
The Teams app allows you to zoom in and out of content. Here’s how you can do it.
- Tap and drag to see different parts of the screen.
- To zoom in or zoom out of a certain section, pinch in or pinch out on your mouse trackpad, or use keyboard shortcuts (Control/Command + plus sign or Control/Command + minus sign)
3. Can I record shared content?
Yes, you can record your screen while sharing it.
You can start screen recording by selecting the Start Recording option from the sharing toolbar. Anyone can start or stop the recording, except the person from another organization or a guest.
Wrap up
With Microsoft Teams, you can easily share your screens from whatever device you use. You can also share your presentations and other files and give or take control of the shared screen.
Follow the steps given above to easily share your screen in Microsoft Teams and get the most out of the platform.


